Quick Start: AI Agent Control in 5 Minutes
Editions: OSS, Cloud, Enterprise. Unless stated otherwise, everything on this page ships in OSS.
Welcome! This guide walks you through setting up Preloop end-to-end, from signup to testing layered access rules with Claude Code.
Already running an agent locally?
The fastest path is the one-line CLI install. It detects your existing agents (Claude Code, Codex CLI, Gemini CLI, OpenClaw, OpenCode and others), creates an account if needed, and onboards them in under a minute. See Onboard local agents with the CLI before continuing here.
Watch the full demo
See the complete flow in action: Watch on YouTube
What You'll Accomplish
- Create your account
- Connect an MCP server and scan its tools
- Create approval workflows and layered access rules
- Connect Claude Code and the mobile app
- Test three payment scenarios: auto-allow, deny, and async approval
Ready to build agentic workflows? Continue to Part 2: Agentic Flows
Step 1: Create Your Account
- Open
/registeron your Preloop server (on Preloop Cloud, click Sign Up on preloop.ai) - Enter a Username, Email and Password (8 to 72 characters) and click Create account
- Open the email "Verify your Preloop account" and click Verify your email
- Sign in with your username and password
Cloud and Enterprise
On Preloop Cloud a new account starts a trial of a paid plan. When the trial ends without a subscription, the account moves to the Free plan. See Account setup.
Step 2: Add an MCP Server
We host an example MCP server with a pay tool for testing.
- Open Tools in the sidebar
- Click Add MCP server
- Fill in:
- Server Name:
Example MCP Server - Server URL:
https://example-mcp.preloop.ai/mcp - Transport: HTTP Streaming (fixed)
- Authentication Type: None
- Server Name:
- Click Add, then Scan for tools
Step 3: Create Approval Workflows & Access Rules
Preloop lets you layer multiple rules on each tool. In this demo we create two approval workflows and four rules that together implement a tiered payment policy.
Create Approval Workflows
- On Tools, open the Workflows menu and click New workflow
- Create a Support workflow of type Standard Human Approval with one approver, and click Create Policy
- Create a CFO workflow the same way, with your finance approver
Cloud and Enterprise
Workflows with several approvers, team approvers, a quorum above one or escalation need Cloud or Enterprise. See Team Approvals.
Configure Layered Access Rules
Open the pay tool and add four rules with Add rule (evaluated top to bottom):
| Priority | Condition | Action | Workflow |
|---|---|---|---|
| 1 | amount <= 100 |
Allow | n/a |
| 2 | amount <= 200 |
Require approval | Support |
| 3 | amount <= 1000 |
Require approval | CFO |
| 4 | (default) | Deny | n/a |
Set Justification requirement to Required so agents must explain why they need to call the tool.
What just happened?
Calls to the pay tool now pass the access rules before they reach the MCP server.
Step 4: Connect Claude Code
Create an API Key
- Open Settings > API Keys
- Click Create API key, name it, and copy the key
Save Your API Key
You won't see it again! Store it somewhere safe.
Configure Claude Code
Register Preloop as an MCP server in Claude Code (replace YOUR_API_KEY, and the host if you self-host):
claude mcp add \
  --transport http \
  --header "Authorization: Bearer YOUR_API_KEY" \
  preloop \
  https://preloop.ai/mcp/v1
One-command alternative
Tools > Connect an agent shows the same path: install the CLI, run preloop login, then preloop agents discover. The CLI detects Claude Code (and Codex, Gemini, OpenClaw, OpenCode and others), wires the MCP server through Preloop with the correct token, and lets you confirm each change. See Onboard local agents with the CLI.
Install the Mobile App (Optional)
Download the Preloop mobile app on your iPhone, iPad, or Android device to approve requests on the go.
Step 5: Test the Approval Flow
With the layered rules in place, try three payment scenarios:
Scenario A: Auto-Allow ($50 payment)
$ claude -p 'Pay $50 to Marvin for lunch' --allowedTools mcp__preloop__pay
The payment of $50 to Marvin has been completed successfully.
The payment is under $100, so it's automatically allowed, no approval needed.
Scenario B: Denied ($5,000 payment)
$ claude -p 'Pay $5000 to Marvin for a yacht' --allowedTools mcp__preloop__pay
The payment was denied. Amount $5000 exceeds the maximum allowed threshold.
The payment exceeds $1,000, hitting the deny rule. Claude receives the denial immediately.
Scenario C: Async Approval ($150 payment)
$ claude -p 'Pay $150 to Marvin for office supplies' --allowedTools mcp__preloop__pay
Waiting for approval...
The payment is between $100 and $200, triggering the Support approval workflow. Approve it from your phone or from Audit > Approvals in the console:
Review the audit trail
Every tool call (allowed, denied, or approved) is recorded. Open Audit > Sessions for the session timeline and Audit > Approvals for the decisions:
Cloud and Enterprise
Audit > All events lists every audit event across the account.
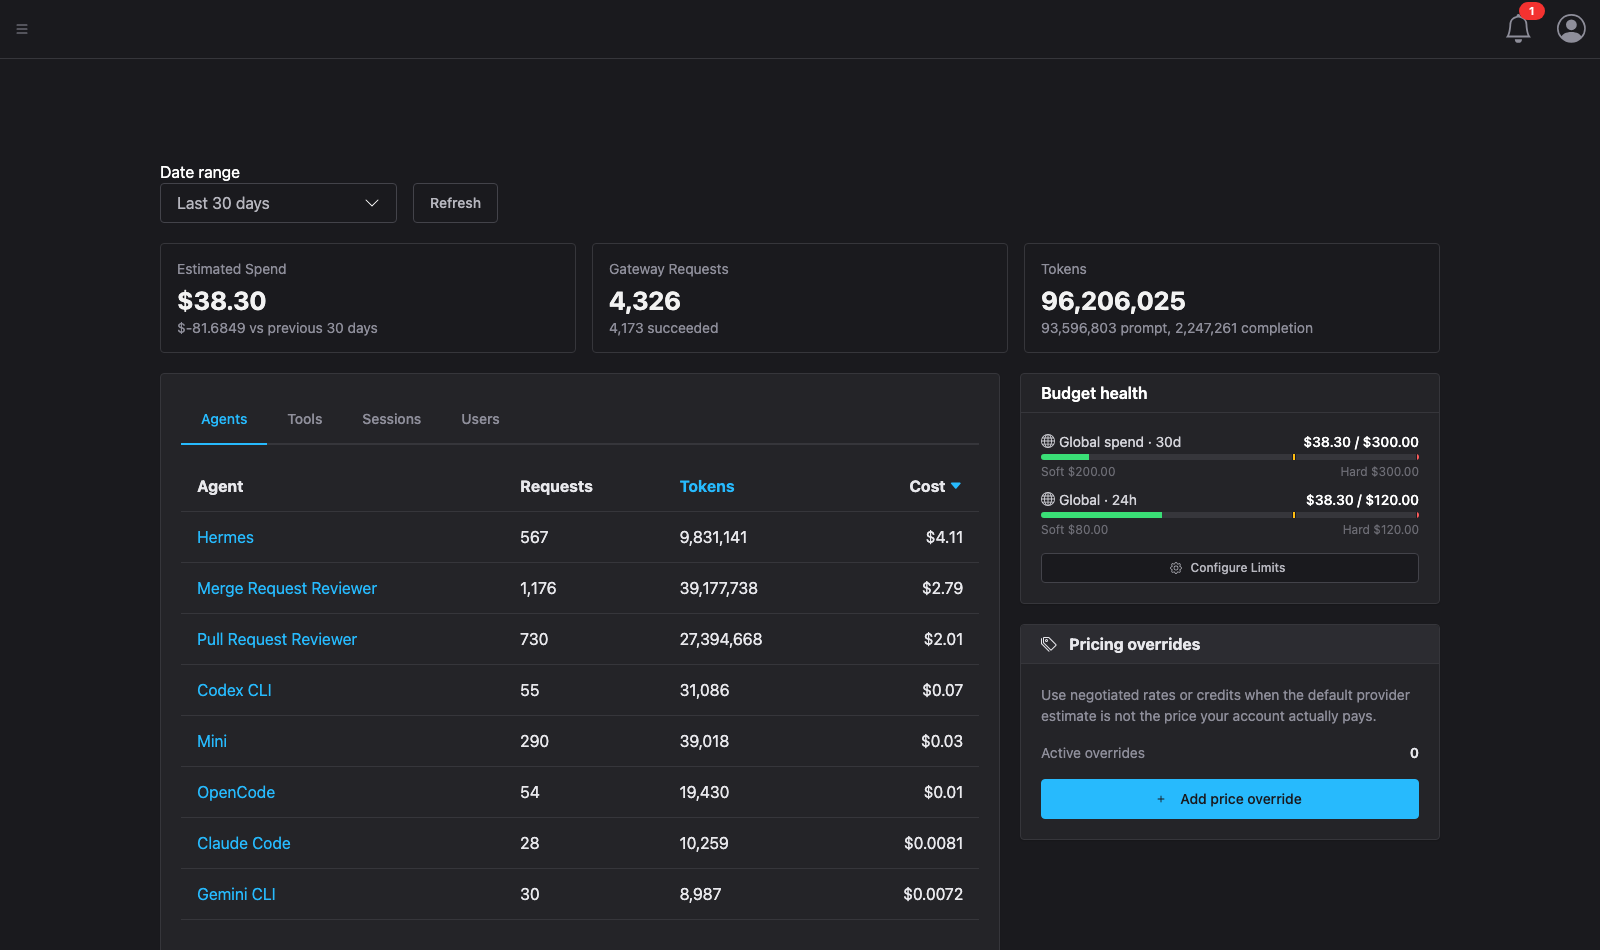
Step 6: Monitor Cost & Attribution
Preloop attributes every token and tool call to the specific agent or user.
- Navigate to Cost in the sidebar
- View the dashboard showing estimated spend, request counts, and token usage
- Drill down into per-agent or per-tool costs to identify high-spend patterns
Success!
You've just:
- Created your Preloop account and API key
- Connected an MCP server and scanned its tools
- Built layered access rules with two approval workflows
- Tested auto-allow, deny, and async approval scenarios
- Reviewed the full audit trail
What's Next?
-
Build Agentic Flows
Create event-driven workflows that use your protected tools with AI agents.
-
Mobile Apps
Approve requests from your iPhone, iPad, Apple Watch, or Android device.
-
Advanced Conditions
Write complex approval conditions using CEL expressions.
-
Team Approvals
Configure quorum, escalation, and team-based approval workflows (Cloud and Enterprise).